0%

WSL2 部署 Ubuntu-20.04 及基本环境配置

一、WSL 配置

  • 设置 WSL2
1
wsl --set-default-version 2

1. 从系统盘迁移

  • 关闭原系统

1
wsl --shutdown
  • 查看 wsl 状态

1
wsl -l -v
  • 导出系统镜像

1
wsl --export Ubuntu-20.04 E:\WSL\Ubuntu-20.04\ubuntu.tar
  • 注销原系统

1
wsl --unregister Ubuntu-20.04
  • 查看系统注销状态,导入系统

1
2
wsl -l -v
wsl --import Ubuntu-20.04 E:\WSL\Ubuntu-20.04 E:\WSL\Ubuntu-20.04\ubuntu.tar --version 2
  • 此时进入 Linux 终端默认为 root 用户。若需修改,进入 Ubuntu 20.04.6 LTS 根目录,修改默认用户

1
ubuntu2004.exe config --default-user hyper

2. 基本配置

  • 首先查看系统版本

1
lsb_release -a
  • 根据系统版本换用清华源

1
sudo vim /etc/apt/sources.list
1
2
3
4
5
6
7
8
9
10
11
12
13
14
15
16
17
18
19
20
21
22
23
24
25
26
27
28
29
30
31
# Ubuntu 20.04
deb http://mirrors.aliyun.com/ubuntu/ focal main restricted universe multiverse
# deb-src http://mirrors.aliyun.com/ubuntu/ focal main restricted universe multiverse

deb http://mirrors.aliyun.com/ubuntu/ focal-security main restricted universe multiverse
# deb-src http://mirrors.aliyun.com/ubuntu/ focal-security main restricted universe multiverse

deb http://mirrors.aliyun.com/ubuntu/ focal-updates main restricted universe multiverse
# deb-src http://mirrors.aliyun.com/ubuntu/ focal-updates main restricted universe multiverse

deb http://mirrors.aliyun.com/ubuntu/ focal-proposed main restricted universe multiverse
# deb-src http://mirrors.aliyun.com/ubuntu/ focal-proposed main restricted universe multiverse

deb http://mirrors.aliyun.com/ubuntu/ focal-backports main restricted universe multiverse
# deb-src http://mirrors.aliyun.com/ubuntu/ focal-backports main restricted universe multiverse

# Ubuntu 22.04
deb http://mirrors.aliyun.com/ubuntu/ jammy main restricted universe multiverse
# deb-src http://mirrors.aliyun.com/ubuntu/ jammy main restricted universe multiverse

deb http://mirrors.aliyun.com/ubuntu/ jammy-security main restricted universe multiverse
# deb-src http://mirrors.aliyun.com/ubuntu/ jammy-security main restricted universe multiverse

deb http://mirrors.aliyun.com/ubuntu/ jammy-updates main restricted universe multiverse
# deb-src http://mirrors.aliyun.com/ubuntu/ jammy-updates main restricted universe multiverse

deb http://mirrors.aliyun.com/ubuntu/ jammy-proposed main restricted universe multiverse
# deb-src http://mirrors.aliyun.com/ubuntu/ jammy-proposed main restricted universe multiverse

deb http://mirrors.aliyun.com/ubuntu/ jammy-backports main restricted universe multiverse
# deb-src http://mirrors.aliyun.com/ubuntu/ jammy-backports main restricted universe multiverse
  • 更新

1
sudo apt-get update && sudo apt-get upgrade

二、C/C++ 开发环境

1. VS Code

  • 安装 VS Code Server for x64

1
2
3
4
sudo apt-get install gcc
sudo apt-get install gdb
sudo apt-get install g++
code .

2. Qt

Index of /archive/qt/5.14/5.14.2,注意此版本以上无离线安装包

  • 安装依赖库

1
2
3
4
5
6
7
8
9
su root
# libX11交叉编译
apt-get install libx11-dev libxext-dev libxtst-dev
# openGL核心库、支持库
apt-get install mesa-common-dev
apt-get install libglu1-mesa-dev libgl1-mesa-glx
apt-get install xlibmesa-glu-dev
# 通用字体配置库
apt-get install libfontconfig1
  • 安装 Qt,全部安装需要接近 5G 的存储空间

1
2
3
4
wget https://download.qt.io/archive/qt/5.14/5.14.2/qt-opensource-linux-x64-5.14.2.run
chmod +x qt-opensource-linux-x64-5.14.2.run
# 先断网,避免复杂的在线验证环节
./qt-opensource-linux-x64-5.14.2.run

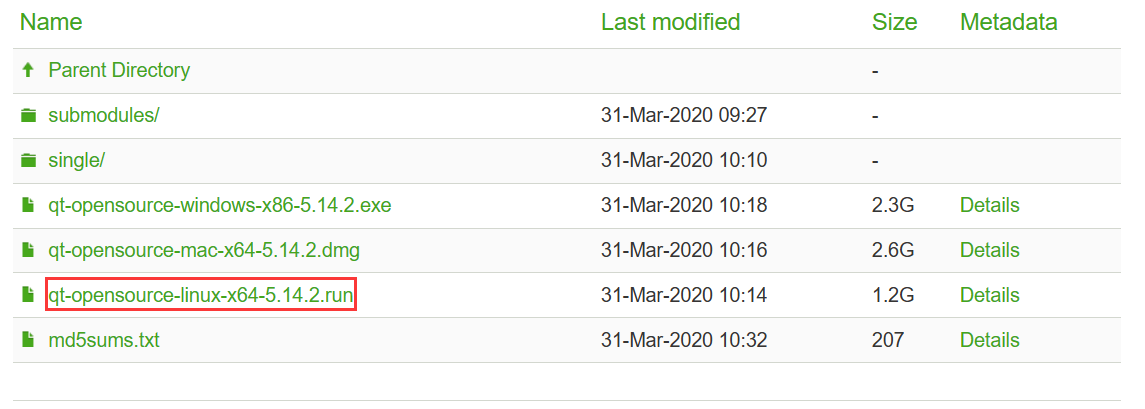
注:若出现./qt-opensource-linux-x64-5.14.2.run: error while loading shared libraries: libxkbcommon-x11.so.0: cannot open shared object file: No such file or directory 报错,表明缺少 libxkbcommon-x11.so.0 共享库文件

1
2
sudo apt-get update
sudo apt-get install libxkbcommon-x11-0
  • 配置环境变量

1
sudo vim /etc/profile
  • 在文件末尾添加:

1
2
export PATH="/home/hyper/software/Qt5.14.2/Tools/QtCreator/bin:$PATH"
export PATH="/home/hyper/software/Qt5.14.2/5.14.2/gcc_64/bin:$PATH"
  • 使配置生效

1
source /etc/profile
  • 使用 Qtchooser,修改 Qt 默认启动配置

1
2
3
4
apt-get install qtchooser
qtchooser -install qt5.14.2 /home/hyper/software/Qt5.14.2/5.14.2/gcc_64/bin/qmake
export QT_SELECT=qt5.14.2
qtchooser -l
  • 修改配置文件

1
vim /usr/lib/x86_64-linux-gnu/qt-default/qtchooser/qt5.14.2.conf
  • 将第一、二行分别改为 bin 目录、qt 安装目录的路径

1
2
/home/hyper/software/Qt5.14.2/5.14.2/gcc_64/bin
/home/hyper/software/Qt5.14.2
  • 测试 qmake

1
qmake -v
  • 测试 Qtcreator

1
2
cd /home/hyper/software/Qt5.14.2/Tools/QtCreator/bin
./qtcreator

3. Cmake

https://github.com/Kitware/CMake/releases/

1
sudo apt install cmake

三、OpenSSL

  • 查看通过 WSL2 下载的 Ubuntu 中自带的 openssl 位置

1
which openssl
  • 下载依赖及源码

1
2
3
4
5
su root
apt install build-essential zlib1g-dev -y
cd /usr/local/src/
wget https://www.openssl.org/source/openssl-3.0.10.tar.gz
tar xzvf openssl-3.0.10.tar.gz
  • 配置构建

1
2
3
4
5
cd openssl-3.0.10
./config --prefix=/usr/local/ssl --openssldir=/usr/local/ssl shared zlib
make
make test
make install
  • 配置共享库

1
2
cd /etc/ld.so.conf.d/
vim openssl-3.0.10.conf
  • 在配置中新增

1
/usr/local/ssl/lib64
  • 重新加载动态链接

1
ldconfig -v
  • 配置 openssl 二进制文件,备份并创建新的环境文件

1
2
mv /bin/openssl /bin/openssl.backup
vim /etc/profile.d/openssl.sh
  • 在文件中添加以下配置

1
2
3
4
OPENSSL_PATH="/usr/local/ssl/bin"
export OPENSSL_PATH
PATH=$PATH:$OPENSSL_PATH
export PATH
  • 授予权限

1
chmod +x /etc/profile.d/openssl.sh
  • 重新加载 OpneSSL 的环境文件,检查默认的 $PATH

1
2
source /etc/profile.d/openssl.sh
echo $PATH
  • 完成,重新验证更新后的 OpenSSL 版本

1
2
which openssl
openssl version -a

Output

1
2
3
4
5
6
7
8
9
10
OpenSSL 3.0.10 1 Aug 2023 (Library: OpenSSL 3.0.10 1 Aug 2023)
built on: Sat Oct 14 07:40:43 2023 UTC
platform: linux-x86_64
options: bn(64,64)
compiler: gcc -fPIC -pthread -m64 -Wa,--noexecstack -Wall -O3 -DOPENSSL_USE_NODELETE -DL_ENDIAN -DOPENSSL_PIC -DOPENSSL_BUILDING_OPENSSL -DZLIB -DNDEBUG
OPENSSLDIR: "/usr/local/ssl"
ENGINESDIR: "/usr/local/ssl/lib64/engines-3"
MODULESDIR: "/usr/local/ssl/lib64/ossl-modules"
Seeding source: os-specific
CPUINFO: OPENSSL_ia32cap=0xfedab2235f8bffff:0x9c27a9

四、Python 开发环境

1. miniconda

Latest Miniconda installer links by Python version — miniconda documentation

  • 获取并安装 miniconda

1
2
wget https://repo.anaconda.com/miniconda/Miniconda3-py38_23.9.0-0-Linux-x86_64.sh
bash Miniconda3-py38_23.9.0-0-Linux-x86_64.sh

miniconda 的默认安装路径为 /home/<username>/miniconda3,可以自己选择合适的位置,如:

1
/home/<username>/software/miniconda3
  • 退出 conda 基础环境,并取消自动激活:

1
2
conda deactivate
conda config --set auto_activate_base false
  • 查看 conda 版本

1
conda -V

1
2
conda config --set show_channel_urls yes
sudo gedit .condarc
  • 替换 condarc 文件内容

1
2
3
4
5
6
7
8
9
10
11
12
13
14
15
16
channels:
- defaults
show_channel_urls: true
default_channels:
- https://mirrors.tuna.tsinghua.edu.cn/anaconda/pkgs/main
- https://mirrors.tuna.tsinghua.edu.cn/anaconda/pkgs/r
- https://mirrors.tuna.tsinghua.edu.cn/anaconda/pkgs/msys2
custom_channels:
conda-forge: https://mirrors.tuna.tsinghua.edu.cn/anaconda/cloud
msys2: https://mirrors.tuna.tsinghua.edu.cn/anaconda/cloud
bioconda: https://mirrors.tuna.tsinghua.edu.cn/anaconda/cloud
menpo: https://mirrors.tuna.tsinghua.edu.cn/anaconda/cloud
pytorch: https://mirrors.tuna.tsinghua.edu.cn/anaconda/cloud
pytorch-lts: https://mirrors.tuna.tsinghua.edu.cn/anaconda/cloud
simpleitk: https://mirrors.tuna.tsinghua.edu.cn/anaconda/cloud
deepmodeling: https://mirrors.tuna.tsinghua.edu.cn/anaconda/cloud/
  • 清理索引缓存

1
conda clean -i
  • 创建 Python 3.8 虚拟环境

1
conda create -n py38 python=3.8
  • 查看已安装的虚拟环境

1
conda info -e

2. pip

  • 换清华源

1
2
3
conda activate py38
pip config set global.index-url https://pypi.tuna.tsinghua.edu.cn/simple
conda deactivate
  • 若需删除虚拟环境,可执行下述命令:

1
conda remove -n [env_name] --all

五、Docker

在 Win 系统中安装 Docker Desktop。在 Settings 中取消 Enable integration with my default WSL distro 选项,并开启 Enable integration with additional distros: 下的对应发行版开关

  • 验证 Docker 集成情况

1
sudo docker run hello-world

Output

1
2
3
4
5
6
7
8
9
10
11
12
13
14
15
16
17
18
19
20
Hello from Docker!
This message shows that your installation appears to be working correctly.

To generate this message, Docker took the following steps:
1. The Docker client contacted the Docker daemon.
2. The Docker daemon pulled the "hello-world" image from the Docker Hub.
(amd64)
3. The Docker daemon created a new container from that image which runs the
executable that produces the output you are currently reading.
4. The Docker daemon streamed that output to the Docker client, which sent it
to your terminal.

To try something more ambitious, you can run an Ubuntu container with:
$ docker run -it ubuntu bash

Share images, automate workflows, and more with a free Docker ID:
https://hub.docker.com/

For more examples and ideas, visit:
https://docs.docker.com/get-started/

六、其他密码学库

1. GMP

https://gmplib.org/

  • 解压

1
tar xf gmp-6.3.0.tar.xz -C ../software/
  • 确保已安装 g++ 和 m4

1
2
3
4
sudo apt install g++
sudo apt install m4
g++ -v
m4 --v
  • 进入目录安装

1
2
3
4
./configure
make
make check
sudo make install
  • 更新共享库的链接和缓存,使系统能够正确加载动态链接共享库。否则,后续安装 NTL 库时会出现 version number mismatch: inconsistency between gmp.h and libgmp 报错

1
sudo ldconfig

2. NTL

https://libntl.org/download.html

  • 解压

1
tar xzvf ntl-11.5.1.tar.gz -C ../software/
  • 进入 src 子目录,安装

1
2
3
4
./configure
make
make check
sudo make install


参考文章

  1. 【WSL2 教程】WSL 迁移到非系统盘_wsl2 迁移_花花少年的博客 - CSDN 博客

  2. How To Install OpenSSL 3 on Ubuntu 22.04 - HostnExtra

  3. ubuntu 安装 Miniconda_Baby_of_breath 的博客 - CSDN 博客

  4. Ubuntu20.04 安装 Qt5.14.2~ 遇到问题 “段错误 (核心已转储)” “qt.qpa.plugin: Could not load the Qt platform plugin “xcb”“_qtcreator 已放弃核心已转储 - CSDN 博客

  5. cmake 使用详细教程(日常使用这一篇就足够了)_cmake 教程_李吱恩的博客 - CSDN 博客

  6. 基于 WSL2 的 VeighNa Docker 安装指南 - 知乎 (zhihu.com)

  7. 在 Ubuntu 上安装 NTL 库以及编译测试

  8. Version number mismatch: inconsistency between gmp.h and libgmp

  9. ntl - 安装及使用